News

Do Hair Oils Actually Stop Hair Fall or Just Reduce Breakage? A Dermatologist's Clarification
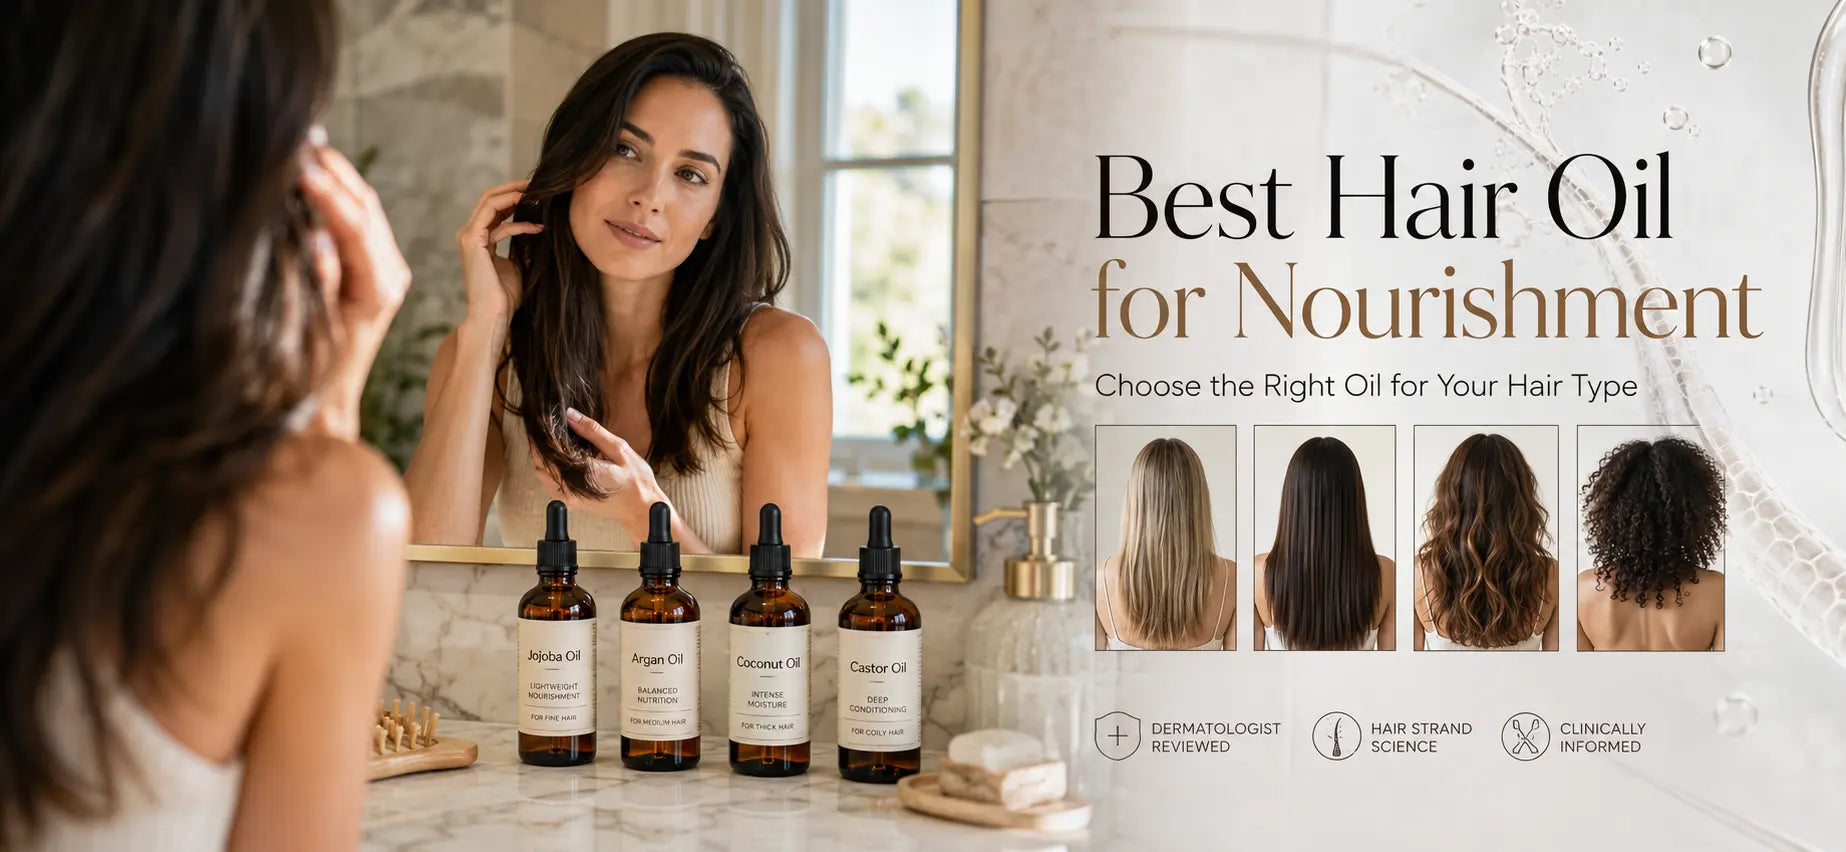
Most hair oils do not stop hair fall. This is the clinically honest answer, and it is one that most hair oil marketing actively obscures. The confusion arises because hair oil brands use 'hair fall' and 'breakage' as interchangeable terms. They are not. They describe two entirely different physiological processes with entirely different causes, treatments, and outcomes. Understanding which one you are actually experiencing is the single most important step in choosing the right response. The direct answer, upfront Hair oils genuinely help with breakage, specifically the structural fracturing of the hair shaft caused by dryness, heat, chemical processing, and mechanical handling. Hair oils have limited to no effect on true hair fall, which refers to the shedding of strands from the follicle root caused by stress, hormonal shifts, nutritional deficiency, thyroid dysfunction, or genetic pattern hair loss. A 2019 expert consensus panel published in the Indian Journal of Dermatology, Venereology and Leprology noted explicitly that hair oil does not play an important role in the management of telogen effluvium, the most common clinical cause of increased hair shedding. Exception: a small number of oils, specifically rosemary oil, pumpkin seed oil, and black seed oil, have clinical trial evidence for supporting hair growth in specific alopecia conditions. Castor oil and most other popular hair oils do not. The Three Types of Hair Loss You Need to Distinguish Before evaluating what, any oil can or cannot do, it is essential to be clear about which type of hair loss is occurring. There are three categories, and they behave very differently. 1. Hair shedding (telogen effluvium) This is a follicle-level event. The hair strand is released from the root at the end of its natural resting phase. You can identify shedding strands because they have a small white or translucent bulb at the root end, which is the follicle sheath attached to the base of the strand. Key characteristics: Shedding 50 to 100 strands per day is normal. Excessive shedding begins when this consistently exceeds 100 to 150 strands. The follicle is intact. A new strand begins growing immediately after the shed strand is released. Common triggers include stress, illness, childbirth, nutritional deficiency, and thyroid dysfunction. Hair oils applied to the scalp surface cannot influence whether a follicle completes the shedding phase. The follicle-level trigger is systemic, not topical. 2. Hair loss (alopecia) This is a more serious condition in which follicle activity is permanently or semi-permanently disrupted. The follicle stops producing new strands. Shed strands are not replaced. Common types include: Androgenetic alopecia: DHT-mediated follicle miniaturisation, producing gradual, progressive thinning concentrated at the crown. Alopecia areata: autoimmune attack on hair follicles, producing patchy bald areas. Traction alopecia: mechanical damage from chronic tight hairstyles causing permanent follicle scarring. Scarring alopecias: irreversible follicle destruction from inflammation, infection, or trauma. Hair oils cannot reverse established alopecia. Androgenetic alopecia requires DHT-targeting pharmaceutical agents. Alopecia areata requires immunosuppressive treatment. Scarring alopecias have no topical solution once follicle destruction has occurred. 3. Hair breakage This is a structural event at the hair shaft level. The strand fractures at a point of weakness along its length, not at the follicle root. You can identify breakage because the strands are short, uneven in length, and have no bulb at the end. Key characteristics: Caused by dryness, heat styling, chemical processing (colour, bleach, perms), mechanical stress from combing and tight hairstyles, and hard water mineral deposits. The follicle is completely unaffected. The scalp is producing hair at a normal rate, but ends are breaking before they can accumulate length. Produces the appearance of hair that does not grow, or of increased hair fall when collected in the shower drain. Hair oils directly and meaningfully address breakage through shaft conditioning, moisture retention, and cuticle protection. At a Glance: Shedding, Loss, and Breakage Compared What Hair Oils Actually Do: The Evidence-Based Mechanism Hair oils work at the surface of the hair shaft and scalp. Their primary functions are well-evidenced and genuinely beneficial. The problem is not that oils are ineffective. The problem is that the specific benefits of oils are routinely misrepresented as 'stopping hair fall' when the mechanism is entirely different. Moisture retention and cuticle coating When applied to the hair shaft, oils with suitable molecular structures deposit a hydrophobic film on the cuticle surface. This film: Slows transepidermal water loss from the hair fibre, maintaining strand hydration and flexibility. Reduces friction between adjacent strands during combing, styling, and sleeping, decreasing the mechanical stress that causes cuticle lifting and shaft fracture. Improves the optical smoothness of the cuticle surface, producing the visual appearance of shine and lustre. This mechanism addresses breakage directly. It does not influence the follicle, the growth cycle, or the rate at which hairs enter the telogen shedding phase. Protein loss prevention Coconut oil is the most clinically evidenced oil in this category. A landmark study published in the Journal of Cosmetic Science demonstrated that coconut oil reduces protein loss from the hair shaft by up to 39 percent when used as a pre-wash treatment, outperforming both mineral oil and sunflower oil. This protein-protective effect strengthens the hair shaft against the structural damage that leads to breakage. No equivalent protein-protective evidence exists for castor oil, argan oil, or most other commonly used hair oils. Scalp anti-inflammatory support Several oils, particularly rosemary oil and to a lesser extent castor oil (via ricinoleic acid), exhibit anti-inflammatory properties at the scalp level. A healthy, non-inflamed scalp provides a more optimal environment for follicle function. Important distinctions here: Scalp anti-inflammatory support is a beneficial secondary effect. It is not the same as treating the internal cause of hair shedding. Scalp buildup from over-application of heavy oils can itself cause follicular inflammation, worsening the scalp environment it was intended to improve. The expert consensus panel for telogen effluvium management noted that while oil acts as a good pre-wash conditioner protecting the cuticles, too much oil can have adverse effects. Scalp Massage: The Independent Variable most oil studies ignore A critical confounding factor in virtually all clinical observations about oil and hair health is the scalp massage that typically accompanies oil application. A 2016 study published in ePlasty found that standardised scalp massage for 24 weeks produced a statistically significant increase in hair thickness, independent of any oil applied. Scalp massage: Increases dermal blood flow, improving nutrient delivery to the dermal papilla. Mechanically stimulates follicle stem cells through stretching forces on the subcutaneous tissue. Has independent, documented evidence for improving hair thickness that no topical oil alone has matched. When someone reports that their hair 'improved' after starting a hair oil routine, the massage component is very likely contributing as much as or more than the oil itself. This does not diminish the value of the practice. It does require accuracy about which element is doing the work. Which Oils Have Actual Clinical Evidence for Hair Growth? Most oils used for hair fall do not have clinical trial evidence for hair growth specifically. A smaller subset do. The distinction matters clinically. The practical takeaway: if your primary goal is to address genuine hair shedding or follicle-level hair loss, rosemary oil, pumpkin seed oil, or black seed oil are the only natural oil options with clinical trial support. Castor oil, argan oil, and most other popular choices do not have this evidence and should be positioned as conditioning agents rather than hair loss treatments. How to Tell Whether You Are Experiencing Breakage or True Hair Fall Correctly identifying which type of hair loss you are experiencing determines whether oils are an appropriate primary response or whether medical investigation is needed. The bulb test Collect several strands that have recently shed, from your pillow, brush, or shower drain. Examine the end of each strand closely: White or translucent bulb present at one end: this strand was shed from the follicle root. This indicates shedding or alopecia. If this represents most of your lost strands, oil alone will not resolve the underlying cause. No bulb present, ragged or uneven end: this strand broke mid-shaft. This indicates breakage. Conditioning oils, reduced heat styling, and gentler handling are the appropriate response. Mix of both: breakage and shedding can coexist. Addressing breakage with oils is appropriate alongside investigating the cause of the shedding separately. Length and distribution Breakage strands are typically short, just a few centimetres, and appear in clusters in the sink or brush. Shed strands are full-length (or near full-length) with a bulb at one end. Patchy bald areas or a consistently widening part line suggest alopecia rather than simple breakage or telogen effluvium. Volume and duration If you are seeing very large amounts of shedding, consistently filling the shower drain or finding handfuls during washing. This exceeds what breakage alone typically produces. Excessive shedding sustained over more than 8 to 12 weeks warrants investigation of systemic causes through blood tests (serum ferritin, thyroid function, vitamin D, zinc, hormonal panel). How to Use Hair Oils Correctly If Breakage Is Your Primary Issue If your assessment confirms that breakage rather than true shedding is your primary concern, oils can form a genuinely effective part of your haircare routine. Correct use matters significantly. Pre-wash treatment The most clinically supported application method. Apply oil to dry hair 30 to 60 minutes before washing: Coconut oil is the strongest choice for this purpose given its evidence for reducing protein loss. Apply from mid-lengths to ends, focusing on the areas most prone to dryness and split ends. The expert consensus panel for hair oil management noted that 30 to 60 minutes of oil application is sufficient. Overnight application is not clinically superior for most people and can contribute to scalp buildup. Scalp treatment with massage For scalp health support, apply a small amount of diluted oil (1 part castor or rosemary oil to 3 to 4 parts jojoba or sweet almond) directly to the scalp with a dropper. Massage gently for 3 to 5 minutes using circular motions. This provides both the conditioning benefit of the oil and the independent mechanical benefit of scalp massage. How often to apply Once or twice per week is sufficient for most hair types. Fine or naturally oily hair may require less frequent application to avoid weighing down the hair or exacerbating scalp buildup. Those with hard water (common in Australian metropolitan areas) benefit from periodic clarifying washes to remove mineral and product buildup that accumulates regardless of oil frequency. Choosing the right oil for breakage reduction Thick, coarse, or chemically processed hair: castor oil diluted in coconut oil at a 1:3 ratio provides both conditioning weight and protein protection. Fine or easily weighed-down hair: jojoba oil or sweet almond oil are lighter and less likely to accumulate as coating. Dry scalp alongside breakage: castor oil's ricinoleic acid provides anti-inflammatory scalp support alongside shaft conditioning. Post-wash leave-in conditioning: argan oil is light enough to apply to damp hair without buildup. Skin Ritual Castor Oil: Cold-pressed and hexane-free, preserving the full ricinoleic acid concentration. Formulated without mineral oils or synthetic fragrances, making it suitable for dilution as both a pre-wash scalp treatment and a mid-length conditioning application. Pairs effectively with Skin Ritual's sulphate-free Anti-Hair Fall Shampoo, which removes oil and buildup without stripping the scalp. The shampoo formulation also includes Allium cepa (onion) extract, which provides sulphur compounds that support keratin structural integrity. When Oils Are Not the Right Response: Recognising True Hair Fall Using oils as a primary treatment for true hair shedding or alopecia wastes the time during which effective treatment could be starting. The earlier intervention begins for genuine follicle-level conditions, the greater the proportion of follicles that can be preserved. Oils alone are not the right primary response if you are experiencing: Consistent shedding of full-length strands with root bulbs attached, exceeding 150 per day for more than 3 months. A visibly widening part line or increased scalp visibility at the crown. Patchy areas of thinning or bare scalp rather than diffuse overall thinning. Hair shedding accompanied by fatigue, unexplained weight change, cold or heat intolerance, irregular periods, or mood changes. A family history of pattern hair loss with a matching distribution of thinning beginning to emerge. In these situations, the appropriate step is blood work and clinical assessment, not a change in hair oil. Request serum ferritin, full iron studies, thyroid stimulating hormone, free T4, vitamin D, zinc, and if relevant, a hormonal panel including total testosterone and DHEA-S. If investigations are normal and shedding persists, a dermatologist referral for trichoscopy and further assessment is appropriate. Oils can be used supportively alongside evidence-based treatment but should not be the primary intervention. Related reading: Why Is My Hair Falling Out More Than Usual? 6 Dermatologist-Backed Causes
Learn more
Why Is My Hair Falling Out More Than Usual? 6 Common Causes Explained by Dermatologists
You run your fingers through your hair and a clump comes with them. You look at your shower drain and feel a wave of panic. Your pillow has more hair on it than it did six months ago. If this sounds familiar, you are not imagining it. And you are definitely not alone. Millions of people notice their hair falling out more than usual at some point in their lives, and most of the time, there is a clear, treatable reason behind it. This guide breaks down the 6 most common dermatologist-backed causes of excessive hair fall, what your body is trying to tell you, and what you can actually do about it. How Much Hair Fall Is Actually Normal? Before you panic, it helps to know what normal looks like. The average person loses between 50 and 100 strands of hair every single day. This is part of the natural hair growth cycle and is completely healthy. Hair grows in three phases: the growth phase (anagen), the transition phase (catagen), and the resting or shedding phase (telogen). When more hairs than usual enter the shedding phase at the same time, you notice an increase in hair fall. The 100 Strands Rule Explained If you are consistently losing more than 100 strands per day, seeing visible thinning, or noticing a widening part, that is when it becomes worth investigating. Seasonal shedding (especially in autumn) is also normal and usually resolves within 2 to 3 months on its own. Cause 1: Stress and Hair Loss (Telogen Effluvium) This is the most common reason people notice their hair falling out more than usual, and it often catches people off guard. When your body goes through a period of intense physical or emotional stress, it redirects its energy away from non-essential functions. Hair growth is one of them. How Stress Pushes Hair Into the Shedding Phase The condition is called Telogen Effluvium. Stress triggers a large number of hair follicles to skip the growth phase and jump straight into the resting phase. Two to three months later, all that hair sheds at once. This is why you might experience a sudden spike in hair fall weeks or even months after a stressful event, not during it. Common triggers include: A major illness or surgery Sudden weight loss or crash dieting A traumatic emotional event Prolonged work or life stress A serious fever or infection How Long Does Stress-Related Hair Loss Last? The good news is that telogen effluvium is almost always temporary. Once the stressor is removed or managed, hair typically starts regrowing within 3 to 6 months. Managing stress through sleep, movement, and mindfulness is the most effective first step. Cause 2: Nutritional Deficiencies and Hair Fall Your hair is made of a protein called keratin. It needs a steady supply of vitamins and minerals to grow strong and stay anchored to your scalp. When your diet lacks key nutrients, your body prioritises vital organs over hair follicles. The result is increased shedding and slower regrowth. Iron, Zinc, Biotin and Vitamin D These are the four nutrients most commonly linked to hair fall: Nutrient How It Affects Hair Common Signs of Deficiency Iron Carries oxygen to hair follicles Fatigue, pale skin, brittle nails Zinc Supports hair tissue growth and repair Slow wound healing, white spots on nails Biotin (B7) Strengthens keratin structure Brittle hair and nails, skin rashes Vitamin D Stimulates new hair follicle growth Fatigue, bone pain, low mood Signs Your Diet Is Affecting Your Hair Hair fall increased after a period of restrictive eating or dieting Hair feels thinner and more brittle than before Nails are also weak or breaking easily You feel tired, cold, or foggy even with adequate sleep A simple blood test with your GP can confirm whether a deficiency is behind your hair fall. Cause 3: Hormonal Imbalance and Hair Loss Hormones play a huge role in the hair growth cycle. When they shift, hair is often the first place you see it. This is especially common in women, whose hormone levels fluctuate with menstrual cycles, pregnancy, perimenopause, and menopause. Thyroid, PCOS, and Hair Thinning Two of the most common hormonal causes of hair loss are: Thyroid disorders: Both an underactive thyroid (hypothyroidism) and an overactive thyroid (hyperthyroidism) can cause diffuse hair thinning across the scalp. Hair usually grows back once thyroid levels are managed. PCOS (Polycystic Ovary Syndrome): Elevated androgens (male hormones) in women with PCOS can shrink hair follicles and cause hair to thin at the crown or temples, similar to male pattern baldness. Other hormonal causes include: Coming off the contraceptive pill Perimenopause and menopause (falling oestrogen levels) Testosterone imbalances Hormonal Hair Loss vs Normal Shedding Feature Normal Shedding Hormonal Hair Loss Pattern Diffuse, all over Often at crown, temples, or parting Onset Gradual Can be gradual or sudden Duration Resolves in weeks Continues unless treated Hair regrowth Full regrowth May thin over time if untreated If you suspect hormonal hair loss, a blood test checking your thyroid function, iron levels, and androgen levels is a good starting point. Cause 4: Postpartum Hair Loss If you have recently had a baby and are noticing dramatic hair shedding around 3 to 4 months after giving birth, this is completely normal and has a name: postpartum hair loss (or postpartum telogen effluvium). Why Hair Falls Out After Pregnancy During pregnancy, elevated oestrogen levels keep hair in the growth phase longer than usual. This is why many women enjoy thicker, more lustrous hair during pregnancy. After delivery, oestrogen levels drop rapidly. All that hair that was being held in the growth phase suddenly enters the shedding phase at the same time. The result can feel alarming, but it is simply your body returning to its normal hair cycle. When Does Postpartum Hair Loss Stop? For most women, postpartum hair loss peaks at around 4 months after delivery and resolves completely by month 6 to 12. Eating a nutrient-rich diet, continuing postnatal vitamins, and using a strengthening shampoo can help support hair through this period. Cause 5: Scalp Health and Hair Fall A healthy scalp is the foundation of healthy hair. If your scalp is inflamed, clogged, or struggling, your hair follicles cannot do their job properly. Dandruff, Scalp Inflammation and Hair Fall Conditions that directly affect hair fall include: Seborrhoeic dermatitis (dandruff): Chronic inflammation of the scalp that can weaken hair roots over time Scalp psoriasis: Thick scale buildup that blocks follicles and disrupts growth Folliculitis: Inflammation or infection of hair follicles that can cause patchy shedding Contact dermatitis: Allergic reactions to hair products that irritate the scalp How an Unhealthy Scalp Weakens Hair Roots Think of your scalp like soil. Healthy soil grows strong plants. Inflamed, clogged, or dry soil produces weak ones. When the scalp is inflamed, blood flow to the follicles is reduced. This starves hair roots of oxygen and nutrients, causing strands to weaken and shed prematurely. Regular scalp care, including gentle cleansing, exfoliation, and targeted treatments like rosemary oil, can make a significant difference. Cause 6: Wrong Hair Care Habits Sometimes the cause of excessive hair fall is not internal at all. It is what you are doing to your hair every day. Heat, Chemical Damage and Tight Hairstyles The following habits are among the most common physical causes of hair breakage and loss: Excessive heat styling: Daily use of straighteners, curling wands, or blow dryers above 180°C weakens the hair shaft and causes breakage Chemical treatments: Bleaching, perming, and relaxing damage the hair structure and weaken roots over time Tight hairstyles: Constant tension from tight ponytails, braids, or buns can cause a condition called traction alopecia, where hair follicles are permanently damaged Aggressive brushing: Brushing wet hair or using the wrong brush causes breakage, especially on fragile or fine hair Ingredients in Shampoo That Cause Hair Fall Many everyday shampoos contain ingredients that strip the scalp and weaken hair over time: Sulphates (SLS/SLES): Harsh detergents that strip natural oils and irritate the scalp Silicones: Build up on the scalp and clog follicles over time Parabens: Preservatives that can disrupt hormones and scalp health Synthetic fragrances: Common irritants that cause contact dermatitis in sensitive scalps Switching to a sulphate-free, scalp-friendly shampoo is one of the simplest changes you can make. How to Stop Hair Falling Out More Than Usual Now that you know the causes, here is a practical action plan. 1. Address Your Diet First Add iron-rich foods: spinach, lentils, red meat, pumpkin seeds Eat protein at every meal (hair is made of protein) Consider a hair-specific supplement with biotin, zinc, and Vitamin D Get a blood test to rule out deficiencies before supplementing 2. Build a Scalp Care Routine Wash hair regularly with a gentle, sulphate-free shampoo Use a scalp-specific treatment or oil 1 to 2 times per week Massage your scalp for 3 to 5 minutes when applying oil or shampoo to boost circulation Avoid scratching or picking at the scalp 3. Manage Stress Actively Prioritise 7 to 9 hours of sleep Include 20 to 30 minutes of movement daily Reduce caffeine and alcohol which both contribute to cortisol spikes Try breathwork or mindfulness if stress is chronic 4. Choose the Right Hair Products Sulphate-free shampoo for regular cleansing Conditioner every wash to maintain moisture and reduce breakage Heat protectant before any hot tool use Anti-hair fall or rosemary-based products for active hair loss phases Conclusion Hair falling out more than usual is rarely a sign of something you cannot fix. In most cases, your body is sending a clear signal: it needs better nutrition, less stress, a healthier scalp, or gentler care. The first step is identifying your cause. The second is acting on it consistently. Whether it is switching your shampoo, adding iron to your diet, managing stress, or supporting your scalp, small changes done consistently lead to real results. Your hair can and does grow back. It just needs the right conditions. Not sure where to start with your overall routine? Our scalp and skin care routine guide covers everything from cleansing to treatment, step by step.
Learn more
How to Use Rosemary Oil on Scalp Overnight for Hair Growth: Complete Beginner's Guide
You've probably heard about rosemary oil for hair growth. Maybe you saw it on social media, maybe a friend recommended it, or maybe you've just been struggling with hair fall and want a natural solution that actually works. Here's the good news: rosemary oil is not just a trend. It is one of the most studied natural ingredients for hair growth, and the science behind it is genuinely impressive. But using it correctly makes all the difference. Most people either apply it wrong, leave it on for the wrong amount of time, or skip the most important step entirely. In this guide, you will learn exactly how to use rosemary oil on scalp overnight for hair growth, step by step, from application to wash-off. Whether you are a complete beginner or someone who has tried it before without seeing results, this guide covers everything you need to know. What Is Rosemary Oil and Why Is It So Effective for Hair Grow Rosemary oil is an essential oil extracted from the rosmarinus officinalis plant. It has been used in traditional medicine for centuries, but in recent years, science has caught up with what people already knew. A well-known clinical study compared rosemary oil to 2% Minoxidil (a common pharmaceutical hair loss treatment) and found that after 6 months, both produced similar hair growth results. The key difference? People using rosemary oil reported fewer side effects, particularly less scalp itching. This is why so many Australians are now turning to rosemary oil as a natural, affordable alternative for managing hair loss and thinning. Benefits of Rosemary Oil for Hair Growth Before jumping into the how-to, it helps to understand why rosemary oil works so well. These are not just marketing claims. Each benefit is backed by research. 1. Stimulates Hair Follicles: Rosemary oil is a natural vasodilator. This means it dilates blood vessels and improves blood circulation to the scalp. Better blood flow means hair follicles receive more oxygen and nutrients, which encourages new hair growth and reactivates dormant follicles. 2. Reduces Hair Fall and Breakage: The antioxidants in rosemary oil neutralise free radicals that damage hair follicles and cause premature hair loss. Regular use helps strengthen the roots and significantly reduces daily hair fall. 3. Improves Scalp Health: An unhealthy scalp is one of the most overlooked causes of poor hair growth. Rosemary oil has antimicrobial and anti-inflammatory properties that keep the scalp clean, balanced, and free from excess buildup that can clog follicles. 4. Nourishes Hair Strands: When combined with carrier oils like coconut oil, castor oil, and almond oil (as found in Skin Ritual's Rosemary Hair Growth Oil), rosemary deeply nourishes the hair shaft, reducing dryness, frizz, and brittleness. 5. Fades Scalp Inflammation: If your scalp feels itchy, irritated, or prone to dandruff, rosemary oil's soothing properties help calm inflammation, creating a healthier environment for hair to grow. How to Use Rosemary Oil on Scalp Overnight for Hair Growth: Step-by-Step This is the most effective method for beginners who want to use rosemary oil on scalp overnight and wake up with maximum absorption results. Step 1: Choose the Right Rosemary Oil Not all rosemary oils are the same. For hair growth, you need a rosemary oil that is: Blended with nourishing carrier oils (not pure essential oil, which is too concentrated for direct scalp use) Free from mineral oil, sulphates, and parabens Enriched with supporting ingredients like Fenugreek, Bhringraj, Amla, or Castor Oil Skin Ritual's Rosemary Hair Growth Oil contains rosemary, Fenugreek, Castor oil, and Sweet Neem. It is a complete blend that does not need to be diluted before use. If you are using a pure rosemary essential oil, always dilute it first. Mix 5 to 6 drops of pure essential oil into 2 tablespoons of a carrier oil (coconut or almond) before applying to the scalp. Step 2: Section Your Hair Parting your hair before applying the oil ensures the product reaches your scalp directly rather than sitting on top of your hair strands. How to do it: Use a tail comb to create a centre part Then create 4 to 6 horizontal sections across your scalp Clip each section out of the way as you work This step sounds simple but makes a significant difference in how well the oil absorbs overnight. Step 3: Apply Rosemary Oil Directly to the Scalp Take 5 to 8 drops of rosemary oil into your palm. Using a dropper (if your bottle has one) makes it easier to apply precisely along each parted section. Apply the oil along the parting line, not on the length of your hair. The goal is to get the oil onto your scalp where the follicles are. Conditioning the strands is not the purpose here. Work section by section until your entire scalp has been covered. Step 4: Massage Your Scalp for 3 to 5 Minutes This is the most important step. The scalp massage is not optional. Massaging helps the oil absorb deeper into the scalp, and more importantly, the physical act of massage itself improves blood circulation to the hair follicles. This directly supports hair growth. How to massage correctly: Use your fingertips, not your nails Apply gentle but firm circular pressure Move from the front hairline to the back of the scalp Spend extra time on areas where hair is thinning A 4-minute daily scalp massage has been shown in studies to increase hair thickness over 24 weeks. Combining massage with rosemary oil gives you a compounding effect. Step 5: Cover and Leave Overnight Once you have massaged the oil in, cover your hair with a shower cap or a soft silk hair wrap. This does two things: It prevents the oil from transferring onto your pillow It creates a slightly warm, occlusive environment that helps the oil absorb deeper into the scalp Leave the oil on for a minimum of 4 hours. Overnight (6 to 8 hours) gives the best results. Step 6: Wash Off with a Sulphate-Free Shampoo In the morning, wash your hair thoroughly with a sulphate-free shampoo. This step is critical. A regular shampoo with sulphates will strip the scalp of its natural oils along with the rosemary oil residue, potentially causing more dryness and irritation. A sulphate-free shampoo gently removes the oil without disrupting your scalp's natural moisture barrier. Skin Ritual's Rosemary Shampoo is sulphate and paraben free, and is formulated specifically to pair with the Rosemary Hair Growth Oil for a complete wash-day experience. Wash once, or twice if your hair feels particularly oily. Follow up with a lightweight conditioner on the lengths (not the scalp). How Many Times Should I Use Rosemary Oil for Hair Growth? This is one of the most common questions beginners ask, and the answer depends on your hair type and goals. General recommendation for beginners: Hair Type Frequency Leave-On Time Normal to oily scalp 2 times per week 4 to 6 hours or overnight Dry or flaky scalp 3 times per week Overnight Hair thinning or hair loss 3 times per week Overnight Sensitive scalp 1 to 2 times per week 2 to 4 hours (start slow) The key rule: Consistency matters far more than frequency. Using rosemary oil twice a week for 3 months will always outperform using it every day for 2 weeks and then stopping. How Long to Leave Rosemary Oil in Hair: What the Research Says The longer you leave rosemary oil on your scalp, the more time it has to penetrate the follicles and stimulate circulation. Here is a simple breakdown: 30 minutes to 1 hour: Better than nothing, but minimal absorption. Good for a quick pre-wash treatment. 2 to 4 hours: Decent absorption. Suitable for daytime application before an evening wash. Overnight (6 to 8 hours): Maximum absorption and best results. This is the recommended method for anyone dealing with hair loss, thinning, or slow growth. Longer than overnight: There is no additional benefit to leaving it on for more than 8 hours. Washing off in the morning is perfectly timed. Rosemary Oil Hair Loss Results: What to Realistically Expect One of the biggest reasons people give up on rosemary oil is unrealistic expectations. Here is an honest, realistic timeline: Timeline What You May Notice Week 1 to 2 Scalp feels healthier, less itchy, more balanced Week 3 to 4 Reduced hair fall during washing and brushing Week 6 to 8 New baby hairs may appear at the hairline Week 10 to 12 Visibly thicker, fuller hair in areas of previous thinning Month 4 to 6 Significant overall improvement in hair density and growth Important: Results vary depending on the root cause of your hair loss. Rosemary oil works best for hair loss caused by poor circulation, scalp inflammation, and general thinning. If your hair loss is caused by a medical condition, hormonal imbalance, or nutritional deficiency, speak to a healthcare professional. Overnight Hair Oil Treatment: Tips to Get the Most Out of It Here are some pro tips to make your overnight hair oil treatment as effective as possible: Always apply to a dry scalp. Wet hair dilutes the oil and reduces absorption. Wait until your hair is completely dry before applying. Warm the oil slightly before use. Place the bottle in warm water for 2 to 3 minutes. Warm oil penetrates the scalp faster and feels more comfortable during massage. Use a silk pillowcase or shower cap. A cotton pillowcase absorbs the oil and leaves stains. Silk reduces friction and keeps the oil on your scalp where it belongs. Pair with a scalp massage tool. A silicone scalp massager helps distribute the oil evenly and amplifies the circulation benefits of the massage. Follow up with a sulphate-free shampoo. This is non-negotiable. The right wash-off routine is just as important as the application itself. Does Rosemary Oil Regrow Hair? The Honest Answer Yes, rosemary oil can help regrow hair. However, there is an important distinction to understand. Rosemary oil is most effective for hair loss caused by: Poor scalp circulation Androgenetic alopecia (pattern hair loss, early stages) Stress-related hair thinning (telogen effluvium) Scalp inflammation blocking follicle activity It works by reactivating follicles that have become dormant due to reduced blood flow or inflammation. This is why many users see baby hairs growing back around the hairline after consistent overnight use. However, rosemary oil cannot regrow hair if follicles have completely closed (advanced alopecia) or if the hair loss is caused by an underlying medical condition. In those cases, it is best to speak with a dermatologist or trichologist. For the vast majority of people experiencing general thinning or hair fall, consistent use of rosemary oil 2 to 3 times per week over 3 to 6 months can produce real, visible improvement. Beginner's Summary: Your Overnight Rosemary Oil Routine at a Glance What You Need Rosemary Hair Growth Oil (with fenugreek + carrier oils) Tail comb for sectioning Shower cap or silk hair wrap Sulphate-free rosemary shampoo for wash-off The Routine Night: Section dry hair into 4 to 6 parts Apply 5 to 8 drops along each section directly onto the scalp Massage for 3 to 5 minutes using circular fingertip motions Cover with a shower cap and sleep Use 2 to 3 times per week Morning: Wash hair with sulphate-free shampoo Condition the lengths (avoid the scalp) Air dry where possible Conclusion If you have been dealing with hair fall, slow growth, or thinning hair, the overnight rosemary oil treatment is one of the simplest and most effective things you can add to your routine right now. The process is straightforward. Apply to a dry scalp, massage for a few minutes, cover overnight, and wash off with a sulphate-free shampoo in the morning. Do this 2 to 3 times a week and give it at least 8 to 12 weeks. The results will not happen overnight. But with rosemary oil, you are working with something that science actually supports. Ready to get started? Explore Skin Ritual's Rosemary Hair Growth Oil, a complete blend of rosemary, fenugreek, bhringraj, amla, and castor oil, developed by Australian healthcare professionals and designed to deliver real, visible results. Shop Rosemary Hair Growth Oil → Want the complete hair growth system? The Hair Growth Essentials Bundle includes the Rosemary Oil, Rosemary Shampoo, and Rosemary Conditioner. Everything you need in one affordable kit. Shop Hair Growth Essentials Bundle →
Learn more
Skincare Routine for Acne-Prone Skin: Complete Beginner's Guide
You wake up, look in the mirror, and there it is. Another breakout. You've tried everything. Different face washes, random spot creams, things your friend swore by. But your skin just keeps acting up. Here's the truth: most people with acne-prone skin aren't using the wrong products. They're using too many, in the wrong order, with the wrong ingredients. If you're a beginner based in Australia, this guide is written specifically for you. We'll walk you through a simple, affordable skincare routine for acne-prone skin using active ingredients that are scientifically proven to work. Step by step. No confusion. No overwhelming 10-step routines. No expensive splurges. Just a clear, beginner-friendly plan. Let's fix your skin. Why Do You Get Acne? (The Real Reason) Before we get into routines, let's quickly understand what's happening on your skin. Acne forms when: Dead skin cells clog your pores Excess oil (sebum) gets trapped inside Bacteria multiply and cause inflammation Hormones trigger oil overproduction Most people make one big mistake: they try to "dry out" acne. They strip their skin with harsh products, which actually makes oil production worse. The smarter approach? Balance your skin. Control oil, exfoliate gently, and keep your skin barrier healthy. That is exactly what a good skincare routine for acne-prone skin is built around. What to Look for in Acne Skincare Products (Ingredients That Work) Not all ingredients are created equal. Here are the ones that are actually backed by science for acne-prone skin: Ingredient What It Does Best For Niacinamide (10%) Controls oil, reduces redness, fades dark spots All acne types Salicylic Acid (BHA) Unclogs pores, reduces blackheads Oily, congested skin AHA (Glycolic/Lactic) Exfoliates dead skin cells, improves texture Post-acne marks Ceramides Repairs skin barrier, locks in moisture Dry or irritated acne skin Kojic Acid Fades post-acne pigmentation Dark spots & uneven tone Beginner tip: You don't need all of these at once. Start with Niacinamide. It's the safest, most well-tolerated active ingredient for beginners who are just starting their skincare routine for acne-prone skin. The Complete Beginner Skincare Routine for Acne-Prone Skin Here's your simple, effective 4-step routine split into morning and night. Follow this consistently and your skin will thank you for it. Step 1: Cleanser — Remove Oil, Dirt and Impurities Morning & Night The foundation of any acne routine is a good cleanser. For acne-prone skin, you want something that: Removes excess oil without over-stripping Contains gentle exfoliating acids (AHA or BHA) Doesn't leave your skin feeling tight or dry What to use: A 3% AHA/BHA Foaming Cleanser is perfect for beginners. The AHA component gently exfoliates dead skin cells, while the BHA (salicylic acid) dives into pores to clear congestion. How to use it: Wet your face with lukewarm water Apply a small amount of cleanser and gently massage for 30–60 seconds Rinse thoroughly and pat dry. Never rub. Common mistake: Using hot water. It strips your skin barrier and triggers more oil production. Always use lukewarm water. Step 2: Treatment Serum — Target Acne at the Source Morning & Night After cleansing, your skin is clean and ready to absorb active ingredients. This is where your serum works its magic. For beginners with acne-prone skin, 10% Niacinamide Serum is the number one recommended starting point. Here is why it belongs in every skincare routine for acne-prone skin: Niacinamide benefits for acne-prone skin: ✅ Reduces sebum (oil) production ✅ Minimises pore size ✅ Fades post-acne dark marks ✅ Reduces inflammation and redness ✅ Strengthens your skin barrier ✅ Suitable for all skin types, including sensitive skin It's essentially a multi-tasking powerhouse. Instead of buying 5 different products, one good Niacinamide serum handles most acne-related concerns. How to apply: Apply 2–3 drops onto clean, dry skin Gently press (don't rub) into face and neck Wait 60 seconds before moving to the next step Step 3: Moisturiser — Never Skip This (Yes, Even for Oily Skin) Morning & Night This is the biggest myth in acne skincare: "My skin is oily, I don't need a moisturiser." Wrong. Here's why: When your skin is dehydrated, it produces more oil to compensate. This creates a vicious cycle. More oil leads to more clogged pores, which leads to more acne. The solution is a lightweight, oil-free moisturiser with Ceramides and Hyaluronic Acid (HA). Ceramides repair your skin barrier, which is the protective layer that keeps moisture in and irritants out. When your barrier is strong, your skin calms down, produces less oil, and heals faster. What to use: A Ceramide + HA Oil-Free Moisturiser is ideal for acne-prone skin. It hydrates without clogging pores (non-comedogenic) and actively supports barrier repair. How to apply: Take a small pea-sized amount Warm between your fingers Press gently onto face and neck Pro tip: If your skin feels oily after a few hours, it is not the moisturiser's fault. It simply means your barrier needs more time to repair. Stick with it for 3 to 4 weeks before judging. Step 4 (Morning Only): Sunscreen — The Most Underrated Acne Step Morning only. Non-negotiable. If you're using AHA, BHA, Niacinamide, or any active ingredient, your skin becomes more sensitive to UV rays. Sun exposure without SPF will: Darken post-acne marks permanently Slow down healing Cause more pigmentation Use an SPF 30+ broad-spectrum sunscreen every single morning, even on cloudy days and even indoors near windows. Your Weekly Routine: Add This for Faster Results Once you've used the basic 4-step routine for 2 weeks and your skin has adjusted, you can add one extra step: 2–3x per week (Night Only): Chemical Exfoliant / Skin Peel A 15% AHA/BHA Beginner Peel used 2–3 times a week will: Deeply exfoliate dead skin cells Unclog stubborn pores Dramatically speed up fading of dark spots Improve overall skin texture How to use safely: Apply after cleansing, on dry skin Leave on for 5–10 minutes (start with 5) Rinse thoroughly Follow with Niacinamide serum and moisturiser Always use SPF the next morning Important: Don't use the peel on the same night as other active serums. Keep it simple. On peel nights, follow: cleanser, then peel, then moisturiser only. What About Stubborn Dark Spots From Old Acne? Post-acne hyperpigmentation (those brown or dark marks left after a pimple heals) is one of the most common concerns for people following a skincare routine for acne-prone skin in Australia, especially for those with medium to deeper skin tones. Here's how to tackle them: Double up on brightening ingredients: Niacinamide fades dark spots by blocking melanin transfer Kojic Acid Soap used as your cleanser 2 to 3 times a week actively brightens existing pigmentation and prevents new dark spots from forming 1% Kojic Acid + L-Glutathione Soap is particularly effective for post-acne marks. Use it in place of your regular cleanser 2–3 times a week, let it sit for 60 seconds, then rinse. Beginner Skincare Routine Summary (At a Glance) 🌅 Morning Routine Cleanse: 3% AHA/BHA Foaming Cleanser Treat: 10% Niacinamide + Zinc Serum Moisturise: Ceramide + HA Oil-Free Moisturiser Protect: SPF 30+ Sunscreen Night Routine Cleanse: 3% AHA/BHA Foaming Cleanser Treat: 10% Niacinamide + Zinc Serum Moisturise: Ceramide + HA Oil-Free Moisturiser 2–3x Per Week (Night) Replace step 2 with: 15% AHA/BHA Beginner Peel Optional: Swap cleanser for Kojic Acid + L-Glutathione Soap to target dark spots How Long Before You See Results? Patience is part of the process. Here's a realistic timeline: Timeframe What to Expect Week 1–2 Skin may purge slightly (normal) or just feel cleaner Week 3–4 Active breakouts reduce, skin feels more balanced Week 6–8 Visible improvement in dark spots, texture, and pore size Week 10–12 Significant overall improvement in skin clarity and tone Skin purging vs breakout: If you start a new active ingredient and get a few extra pimples in the first 2 weeks, that is purging and it is normal. If it continues beyond week 3 to 4, reassess the product. Top 5 Mistakes Beginners Make With Acne Skincare Over-washing: More than twice a day strips your barrier and increases oil production Skipping moisturiser: Leads to dehydration and even more oil production Using too many actives at once: Causes irritation and skin sensitivity Popping pimples: Spreads bacteria and causes permanent scarring No sunscreen: Turns temporary dark marks into permanent pigmentation Conclusion Getting clear skin isn't about using every product on the shelf. It's about using the right products, in the right order, consistently. Building a proper skincare routine for acne-prone skin does not have to be complicated or expensive. Start simple: A gentle AHA/BHA cleanser A 10% Niacinamide serum A ceramide moisturiser SPF every morning Give it 4 to 6 weeks. Be patient with your skin. And remember, consistency beats intensity every single time. Ready to start your acne-free journey? Explore Skin Ritual's Bundle. Everything you need is in one affordable kit, formulated by Australian healthcare professionals and designed specifically for acne-prone beginners.
Learn more
Niacinamide vs Vitamin C Serum: 7 Key Differences Explained
You are standing in a skincare aisle, or scrolling through a website, and you see two serums staring back at you. Niacinamide and Vitamin C. Both are highly rated. Both promise glowing, clearer skin. Both are in almost every skincare expert's top list. So which one do you actually need? The answer depends on your skin type, your skin concerns, and how you plan to build your routine. In this guide, we break down 7 key differences between niacinamide and vitamin C serum so you can make the right choice for your skin. What Is Niacinamide? Niacinamide is a form of Vitamin B3. It is a water-soluble vitamin that works on the surface of the skin and inside the skin barrier at the same time. It is one of the most versatile skincare ingredients available. It suits almost every skin type, is gentle enough for sensitive skin, and addresses a wide range of concerns from oiliness to pigmentation to ageing. If you want a deeper look, we have covered all the Niacinamide skin benefits that actually work. Common concentrations: 5% for sensitive or beginner skin, 10% for oily, acne-prone, or more experienced users. What Is Vitamin C Serum? Vitamin C (also called L-Ascorbic Acid in its purest form) is a powerful antioxidant. It protects the skin from free radical damage caused by UV rays and pollution, and it actively brightens the skin by reducing melanin production. It is the gold standard ingredient for anyone dealing with dull skin, uneven tone, dark spots, or early signs of ageing. Common concentrations: 10% for beginners, 20% for more experienced users wanting stronger brightening effects. 7 Key Differences Between Niacinamide and Vitamin C Serum Difference 1: What They Actually Do for Your Skin Both serums improve your skin, but they target completely different problems. Niacinamide works best for: Controlling excess oil and shine Minimising the appearance of enlarged pores Reducing redness, blotchiness, and acne marks Strengthening the skin barrier Gently fading mild hyperpigmentation over time Vitamin C works best for: Brightening dull, tired-looking skin Fading dark spots, sun damage, and post-acne marks Boosting collagen production for firmer skin Protecting skin from daily UV and pollution damage Evening out skin tone Bottom line: If your main concern is oiliness or breakouts, start with niacinamide. If your main concern is dullness or dark spots, start with Vitamin C. Difference 2: Which Skin Types Benefit Most This is often the deciding factor for most people when choosing between the two serums. Difference 3: Stability and Ease of Use This is a practical difference that affects how easy each serum is to use day to day. Niacinamide: Very stable ingredient, does not degrade easily Works in most formulas and pH levels Can be used morning or night without issue Does not require special storage conditions Vitamin C: L-Ascorbic Acid (pure Vitamin C) is notoriously unstable Degrades quickly when exposed to air, light, and heat Turns orange or brown when oxidised, which means it has lost potency Needs to be stored in a dark, cool place and used within 3 months of opening More stable derivatives (like Vitamin C phosphate) are gentler but slightly less potent Storage tip: Keep your Vitamin C serum in a dark cupboard or refrigerator. If it has turned dark orange or brown, it is time to replace it. Difference 4: How Quickly You See Results Patience is part of every skincare routine, but these two serums work on different timelines. Niacinamide tends to show faster results for oiliness and redness. Vitamin C takes longer for deep pigmentation but delivers a visible glow relatively quickly. Difference 5: Skin Sensitivity and Irritation Risk Not all active ingredients are created equal when it comes to how your skin tolerates them. Niacinamide: Extremely well-tolerated across all skin types Rarely causes irritation even at 10% Safe for rosacea, eczema-prone, and reactive skin No purging phase Vitamin C: High-percentage L-Ascorbic Acid (15 to 20%) can sting or tingle on sensitive skin Low pH formulas can cause temporary redness on thin or reactive skin Beginners should start at 10% before moving to 20% More stable derivatives are gentler but can be less effective Sensitive skin tip: If your skin is reactive, start with niacinamide first. Once your barrier is stronger, you can introduce Vitamin C gradually. Difference 6: How They Fit Into Your Routine Knowing when and how to use each serum is just as important as choosing the right one. Niacinamide: Use morning or night, it is flexible Apply after cleansing and toning, before moisturiser Pairs well with most other ingredients including AHA, BHA, and Hyaluronic Acid No SPF requirement but always recommended in the morning Vitamin C: Best used in the morning because it boosts SPF effectiveness and fights UV-caused free radicals during the day Apply after cleansing, before moisturiser and SPF Always follow with SPF 30+ in the morning for maximum benefit Avoid using directly with retinol or AHAs in the same step as it can cause irritation Ideal morning order: Cleanser, Niacinamide or Vitamin C Serum, Moisturiser, SPF. Ideal night order: Cleanser, Niacinamide Serum, Moisturiser. Want to build a complete routine around these serums? Check out our Best Skincare Routine for Your Skin Type guide. Difference 7: Price and Value for Money Both ingredients are widely available and affordable, especially compared to peptide or retinol serums. Budget tip: If you are just starting out and can only buy one serum, niacinamide gives you more value because it is stable, multi-tasking, and lasts longer. Can You Use Niacinamide and Vitamin C Together? This is one of the most searched questions about these two ingredients, and the answer is yes, but with the right approach. There used to be a belief that niacinamide and Vitamin C cancel each other out or cause flushing. This has since been debunked by research. The reaction only happens at very high temperatures, not on your skin. However, using both in the same step at the same time can reduce the effectiveness of Vitamin C slightly because they work at different optimal pH levels. The smarter approach: Use Vitamin C in the morning (antioxidant protection + SPF synergy) Use Niacinamide at night (barrier repair + oil control while you sleep) Or apply them separately in the same routine with a few minutes gap between Pro tip: Many people find the morning Vitamin C and night Niacinamide split to be the most effective routine. Your skin gets the best of both ingredients without any conflict. Niacinamide vs Vitamin C: Full Comparison at a Glance Which Serum Should You Choose? Here is a simple way to decide: Choose Niacinamide if you: Have oily or combination skin Struggle with acne, breakouts, or enlarged pores Have sensitive or reactive skin Are new to active ingredients and want a gentle start Want a stable, easy-to-use everyday serum Choose Vitamin C if you: Have dull or uneven skin tone Have dark spots, sun damage, or post-acne marks Are focused on anti-ageing and collagen support Already have a solid basic routine and want to add a brightening step Want to boost the effectiveness of your daily SPF Use both if you: Want comprehensive results: oil control AND brightening Have combination skin with both oiliness and dark spots Are comfortable with a multi-step routine Skin Ritual offers both a 10% Niacinamide Serum and a 20% Vitamin C Serum, formulated with clinically-backed concentrations at an affordable price. Whether you need one or both, find your perfect match at skinritual.com.au Conclusion Niacinamide and Vitamin C are two of the most powerful and proven skincare ingredients available. They are not competitors. They are a team. Niacinamide keeps your skin clear, balanced, and calm. Vitamin C keeps your skin bright, protected, and youthful. If you can only choose one right now, let your skin concern guide you. Oily and acne-prone skin, go with niacinamide. Dull, uneven, or ageing skin, go with Vitamin C. And when you are ready for both, use them at different times of day and let your skin enjoy everything they offer. Ready to start? Shop Skin Ritual's 10% Niacinamide Serum and 20% Vitamin C Serum at skinritual.com.au. Affordable, active-ingredient skincare made for every skin type.
Learn more
Best Skincare Routine for Your Skin Type That Actually Works
Ever bought a highly-rated serum… and it broke you out? Or followed someone's "perfect" skincare routine on Instagram, only to wake up with dry, irritated skin? You're not alone. And it's not your fault. The truth is, there's no single best skincare routine for everyone. The best routine is the one that's built for your skin type, your lifestyle, and your skin goals. In this guide, you'll learn exactly how to find, build, and stick to a skincare routine that actually works, whether you have dry, oily, sensitive, or ageing skin. What Is a Skincare Routine and Why Does It Matter? A skincare routine is a set of steps you follow daily to cleanse, treat, and protect your skin. Think of it like brushing your teeth. Skip it once, no big deal. Skip it for months and you will notice the damage. A consistent routine helps you: Remove dirt, oil, and pollution from your skin daily Deliver active ingredients that target your specific concerns Maintain your skin barrier so skin stays hydrated and healthy Slow down early signs of ageing The key word here is consistent. Even a simple 3-step routine done daily beats a complicated 10-step routine done twice a week. What Happens When You Skip a Skincare Routine? Without a routine, your skin accumulates dead cells, excess oil, and environmental damage. Over time this leads to dullness, clogged pores, breakouts, and accelerated ageing. Your skin works hard for you every day. A routine is how you work back for it. How to Identify Your Skin Type (Before Anything Else) Before you buy a single product, you need to know your skin type. Using the wrong products for your skin type is the number one reason most skincare routines fail. The Simple Tissue Test to Know Your Skin Type This is the easiest way to figure out your skin type at home: Wash your face with a gentle cleanser Pat dry and wait 30 minutes without applying anything Press a tissue or blotting paper on different areas of your face Observe the result Result Your Skin Type Oil on tissue from all over Oily Skin Oil only from T-zone (nose, forehead) Combination Skin No oil, skin feels tight or flaky Dry Skin Redness, stinging, or irritation Sensitive Skin Balanced, no oil, no tightness Normal Skin 5 Main Skin Types Explained 1. Dry Skin: Feels tight, looks dull, may have flaky patches. Needs rich hydration and barrier-supporting ingredients like ceramides and hyaluronic acid. 2. Oily Skin: Shiny, enlarged pores, prone to blackheads and breakouts. Needs oil-control ingredients like niacinamide and salicylic acid. 3. Combination Skin: Oily T-zone, dry cheeks. Needs a balanced approach with lightweight hydration and targeted treatments. 4. Sensitive Skin: Easily reacts to products, weather, or stress. Needs gentle, fragrance-free, minimal-ingredient formulas. 5. Normal Skin: Well-balanced, rarely breaks out. Can tolerate most ingredients. Focus on maintenance and prevention. Best Skincare Routine by Skin Type Now that you know your skin type, here is the best skincare routine for each one. Skincare Routine for Dry Skin Dry skin needs deep hydration and a strong moisture barrier. Your goal is to lock in moisture and stop water loss. Morning: Gentle hydrating cleanser Hydrating toner or essence Hyaluronic acid serumx` Ceramide-rich moisturiser SPF 30+ Night: Gentle cleanser Vitamin C serum (brightens and repairs) Ceramide + HA intense moisturiser Facial oil or occlusive (optional, seals everything in) Tip: Avoid foaming or gel cleansers as they strip dry skin further. Stick to cream or milk cleansers. Skincare Routine for Oily Skin Oily skin does not need to be dried out. It needs to be balanced. Over-stripping your skin actually makes it produce more oil.Morning: Gentle foaming cleanser (with AHA/BHA) Niacinamide serum (controls oil, shrinks pores) Lightweight oil-free moisturiser SPF 30+ (non-comedogenic) Night: Foaming cleanser Glycolic acid toner (exfoliates, prevents congestion) Niacinamide or salicylic acid serum Lightweight gel moisturiser Tip: Never skip moisturiser thinking it will make skin oilier. Dehydrated skin overproduces oil to compensate. Skincare Routine for Sensitive Skin Sensitive skin needs a slow, minimal approach. Introduce one product at a time and always patch test. Morning: Fragrance-free gentle cleanser Soothing toner (with aloe vera or centella) Simple, minimal-ingredient moisturiser SPF (mineral-based, not chemical) Night: Same gentle cleanser Niacinamide serum (anti-inflammatory, safe for sensitive skin) Ceramide moisturiser (repairs barrier) Tip: Avoid alcohol, fragrance, essential oils, and high-percentage acids. Less is more for sensitive skin. Anti Ageing Skincare Routine (30s, 40s and 50s) Ageing skin needs ingredients that boost collagen, speed up cell turnover, and fight free radical damage. Morning: Gentle cleanser Vitamin C serum (20%, fights free radicals, brightens) Peptide or collagen-boosting moisturiser SPF 50+ (non-negotiable, UV is the number one cause of ageing) Night: Gentle cleanser AHA peel or glycolic acid toner (speeds cell renewal) Retinol or Vitamin A serum (start low at 0.1%) Rich ceramide moisturiser Tip: SPF is your most powerful anti-ageing product. No serum can undo the damage from unprotected sun exposure. Morning Skincare Routine: Step by Step Your morning routine has one main job: protect your skin from the day ahead, including pollution, UV rays, and environmental stress. Step 1: Cleanse Wash away sweat and overnight product residue. Use a gentle cleanser and nothing too harsh. Step 2: Tone (Optional) A toner preps skin to absorb the next products better. Choose one based on your skin type: hydrating for dry skin and exfoliating for oily skin. Step 3: Serum This is where you target your main concern. Vitamin C works well for brightening and anti-ageing. Niacinamide helps with pores and oil control. Step 4: Moisturise Locks in hydration and creates a smooth base. Even oily skin needs this step. Step 5: SPF The most important step in your morning routine. No SPF means undoing everything else you just did. Use SPF 30 minimum and SPF 50 is better. Morning Routine Order: Cleanser, Toner, Serum, Moisturiser, SPF Night Skincare Routine: Step by Step Your night routine has a different job: repair and regenerate. Skin cell turnover peaks at night, so this is when active ingredients work best. Step 1: Double Cleanse (if you wore SPF or makeup) First, use an oil-based cleanser to remove SPF and makeup. Then use your regular water-based cleanser to clean the skin itself. Step 2: Exfoliate (2 to 3 times per week only) Use an AHA/BHA peel or glycolic acid toner to remove dead skin cells and unclog pores. Do not do this every night as your skin needs recovery time. Step 3: Treatment Serum This is the hero of your night routine. Retinol, Niacinamide, Kojic Acid, Vitamin C, whichever targets your main concern. Step 4: Moisturise Use a slightly richer moisturiser than your morning one. Night is when your skin drinks up hydration most effectively. Step 5: Face Oil or Occlusive (Optional) If your skin is very dry, seal everything in with a facial oil or a small amount of balm. Night Routine Order: Cleanser, Exfoliant (2 to 3 times per week), Serum, Moisturiser, Oil (optional) Key Ingredients to Look For (Based on Skin Type) Ingredient Best For Key Benefit Niacinamide (10%) Oily, Acne-prone Controls oil, shrinks pores, reduces redness Vitamin C (20%) All skin types Brightens, fades dark spots, anti-ageing AHA (Glycolic/Lactic) Dry, Dull, Ageing Exfoliates, smooths, boosts cell renewal BHA (Salicylic Acid) Oily, Acne-prone Deep cleans pores, reduces breakouts Ceramides Dry, Sensitive Repairs skin barrier, locks in moisture Hyaluronic Acid Dry, Dehydrated Deep hydration, plumps skin Kojic Acid Hyperpigmentation Fades dark spots, evens skin tone Retinol Ageing skin Boosts collagen, reduces fine lines Common Skincare Routine Mistakes to Avoid Even the best products will not work if you are using them wrong. Here are the most common mistakes beginners make: ❌ Using too many products at once: Start with 3 basics: cleanser, moisturiser, and SPF. Add one new product every 2 weeks so you can track what works. ❌ Skipping SPF: UV damage is the biggest cause of premature ageing and dark spots. SPF every single morning, no exceptions. ❌ Over-exfoliating: AHAs and BHAs are powerful. Using them daily damages your skin barrier. Stick to 2 to 3 times per week maximum. ❌ Not patch testing new products: Always test a new product on your inner arm for 24 to 48 hours before applying to your face. ❌ Mixing incompatible ingredients: Some ingredients work against each other. For example, do not use Vitamin C and AHA together. Use Vitamin C in the morning and AHA at night. ❌ Expecting overnight results: Most skincare ingredients need 4 to 12 weeks to show visible results. Consistency beats everything. Conclusion Finding the best skincare routine for your skin type does not have to be complicated or expensive. It starts with one simple step: knowing your skin. Once you understand whether your skin is dry, oily, sensitive, or ageing, everything else falls into place. You choose the right ingredients. You build a simple morning and night routine. You stay consistent. And that is when the magic happens. Start small. Stay consistent. And give your skin the care it actually deserves. Ready to build your routine? Skin Ritual offers affordable, active-ingredient skincare made for every skin type, from a 20% Vitamin C Serum to AHA/BHA peels and Ceramide moisturisers. Explore the full range and find your perfect routine today at skinritual.com.au
Learn more
What is Niacinamide? 7 Skin Benefits That Actually Work
Niacinamide is the one skincare ingredient that does it all. It minimizes pores, controls oil, fades dark spots, and brings back your natural glow. All backed by real science. In this guide, we break down 7 proven skin benefits, the right percentage for your skin type, and a simple routine to get actual results.
Learn more